平台兼容性
说明
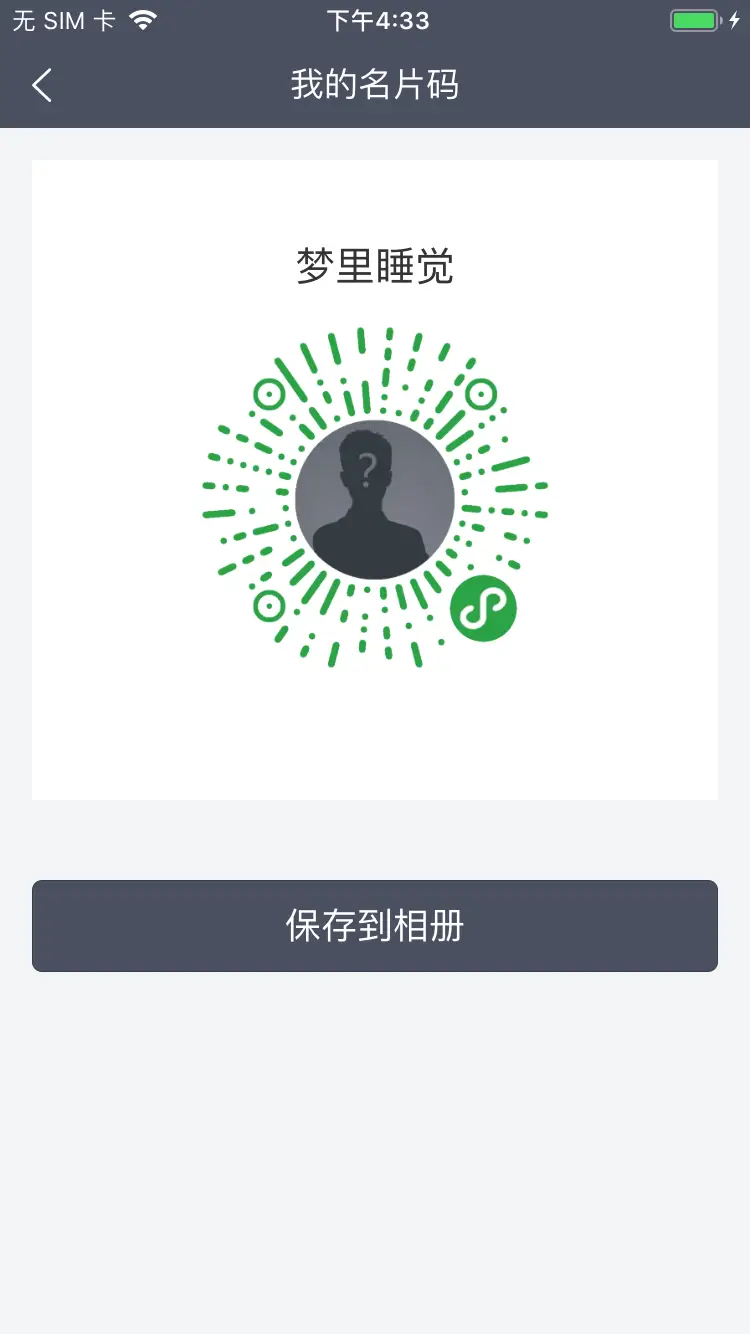
我们在小程序中经常会有将某个页面的部分内容保存为图片,这些内容往往会附带一个二维码或者小程序码。
其实对于这种情况,非常简单,我们使用canvas就能够完成,canvas完成绘制,然后保存为图片,并将图片保存到本地。
canvas的文档在uni-app中很清晰全面。
如果你要看这篇文章,我就假设你刚刚入门vue和uni-app,希望能够对刚刚入手的人有点帮助。
主要就是讲如何 利用 canvas绘图,然后保存为图片。对 小程序小程序码获取 不熟的朋友 介绍如何获取小程序码。
大致思路
容器的准备
如果不需要保存为图片到本地,实际上我们不需要利用canvas来绘制。我们这里利用canvas来绘制就是为了能够将其存储为本地图片。
首先我们得有一个canvas元素,然后给她提供一个canvas-id,这个canvas-id是要用来创建canvas对象的。
canvas还可以利用style来限制她的宽高。
<template>
    <view>
        <view style="height: 32upx;"></view>
        <view v-if="mpWxQr" style="margin: 0 32upx;">
            <canvas canvas-id="mini_poster" :style="{ width: canvasW + 'px', height: canvasH + 'px' }"></canvas>
        </view>
        <view style="height: 80upx;"></view>
        <view v-if="mpWxQr" style="margin: 0 32upx;">
            <button style="background-color: #4A5061; color: #FFFFFF;" @tap="toSaveImage">保存到相册</button>
        </view>
    </view>
</template>
素材的准备
我们这里只做绘制示范,没有什么复杂的内容。
需要的内容:
- 当前用户的名称;
- 当前用户下某个页面的小程序码
事实上,当前用户的 名称 我们是利用vuex做管理的,这里为了简单示范,就放在了当前vue下的data里面。
如果要用vuex的话,也很简单,就是 import { mapState } from 'vuex',在computed里面引入需要的状态。
data() {
    return {
        //
    }
},
computed: {
    ...mapState(['nickname', 'sex]),
    hello() {
        return 'hello'
    }
}
如果你对vuex不熟,那我啰嗦一下,您还可以 import { mapMutations } from 'vuex' , 然后在methods中引入需要的方法。
methods: {
    ...mapMutations(['SET_NICKNAME', 'SET_AVATAR']),
    playMusic() {
        // to play music
    }
}
我们的示范里面没有使用vuex。
小程序码如何获取
刚开始入手uni-app的同学可能也不了解小程序的小程序码的获取。
- 官方文档: https://developers.weixin.qq.com/miniprogram/dev/framework/open-ability/qr-code.html
- 具体我们使用的接口文档: https://developers.weixin.qq.com/miniprogram/dev/api-backend/open-api/qr-code/wxacode.getUnlimited.html
其实很简单,都是后台需要做的事情:
- 在后台获取到 access_token 作为您的 接口调用凭证。如何获取:https://developers.weixin.qq.com/miniprogram/dev/api-backend/open-api/access-token/auth.getAccessToken.html
- 继续在后台调用获取小程序码的接口获取小程序码。
POST https://api.weixin.qq.com/wxa/getwxacodeunlimit?access_token=ACCESS_TOKEN。如果小程序还没有上线,如果提供page参数,会获取失败的。 - 后台将获取到的小程序码的buffer,存储为图片。(我们使用后台将buffer转换成图片,不在前台操作)
- 前台uni-app请求获取小程序码图片,后台返回小程序码。
就这样我们可以获取到小程序码啦。可以是任意页面的小程序码,而且带参数的。
canvas的绘制
材料准备好了,我们就需要绘制出来。绘制其实也大概就是 文字/图片/线条/圆角/多边形等....uni-app的官方有文档。
大致如下:
- 生成canvas对象;
- 对绘制内容进行定位;
- 绘制
            toDrawCanvas() {
                const left_padding = uni.upx2px(64)
                const top_padding = uni.upx2px(120)
                let ctx = uni.createCanvasContext('mini_poster')
                ctx.fillStyle = '#FFFFFF'
                ctx.fillRect(0, 0, this.canvasW, this.canvasH)

                ctx.setFillStyle('#333333')
                ctx.setFontSize(20)
                ctx.setTextAlign('center')
                ctx.fillText(this.nickname, 0.5 * this.canvasW, top_padding)

                ctx.drawImage('../../static/logo.png', (that.canvasW - 180) * 0.5, top_padding + 20, 180, 180)
                ctx.draw()
            }
绘制内容很简单,多对着官方文档操作操作。
uni.createCanvasContext创建canvas对象,然后就是根据接口一顿猛操作。
需要注意的是:文字的居中排版这些。
ctx.fillText(this.nickname, 0.5 * this.canvasW, top_padding) 我们设置的x是整个canvas宽度的一半。
上面我们绘制的图片其实是 本地图片,而网络图片不直接支持绘制。
ctx.drawImage('../../static/logo.png', (that.canvasW - 180) * 0.5, top_padding + 20, 180, 180)
怎么办?
当然是先下载下来,然后再绘制!
                uni.downloadFile({
                    url: imageUrl,
                    success: (res) => {
                        ctx.drawImage(res.tempFilePath, (that.canvasW - 180) * 0.5, top_padding + 20, 180, 180)
                        ctx.draw()
                    },
                    fail() {
                        uni.showToast({
                            icon: 'none',
                            title: '小程序码下载失败'
                        })
                    }
                })
canvas保存为图片
这个就更加简单。
- 首先,将canvas保存为临时文件:
uni.canvasToTempFilePath; - 然后将其保存为本地图片
            toSaveImage() {
                const that = this
                uni.canvasToTempFilePath({
                    canvasId: 'mini_poster',
                    success: (res) => {
                        uni.saveImageToPhotosAlbum({
                            filePath: res.tempFilePath,
                            success: () => {
                                uni.showToast({
                                    title: '保存成功'
                                })
                            },
                            fail() {
                                uni.showToast({
                                    icon: 'none',
                                    title: '保存名片码失败'
                                })
                            }
                        })
                    },
                    fail() {
                        uni.showToast({
                            icon: 'none',
                            title: '保存名片码失败'
                        })
                    }
                })
            }
全部代码
这个代码是需要下载图片的。
<template>
    <view>
        <view style="height: 32upx;"></view>
        <view v-if="mpWxQr" style="margin: 0 32upx;">
            <canvas canvas-id="mini_poster" :style="{ width: canvasW + 'px', height: canvasH + 'px' }"></canvas>
        </view>
        <view style="height: 80upx;"></view>
        <view v-if="mpWxQr" style="margin: 0 32upx;">
            <button style="background-color: #4A5061; color: #FFFFFF;" @tap="toSaveImage">保存到相册</button>
        </view>
    </view>
</template>

<script>
    import { getMiniWxQrCode } from '@/api/user.js'
    export default {
        data() {
            return {
                nickname: '热豆科技',
                mpWxQr: null,
                canvasW: 0,
                canvasH: 0
            }
        },
        onLoad() {
            const systemInfo = uni.getSystemInfoSync()
            this.canvasW = systemInfo.windowWidth - uni.upx2px(64)
            this.canvasH = uni.upx2px(640)
            const that = this
            getMiniWxQrCode().then(respone => {
                that.mpWxQr = respone.data.mp_wx_qr
                that.toDrawCanvas()
            }).catch(err=>{
                if (err.data && err.data.detail) {
                    uni.showToast({
                        icon: 'none',
                        title: err.data.detail
                    })
                }
            })
        },
        methods: {
            toSaveImage() {
                const that = this
                uni.canvasToTempFilePath({
                    canvasId: 'mini_poster',
                    success: (res) => {
                        uni.saveImageToPhotosAlbum({
                            filePath: res.tempFilePath,
                            success: () => {
                                uni.showToast({
                                    title: '保存成功'
                                })
                            },
                            fail() {
                                uni.showToast({
                                    icon: 'none',
                                    title: '保存名片码失败'
                                })
                            }
                        })
                    },
                    fail() {
                        uni.showToast({
                            icon: 'none',
                            title: '保存名片码失败'
                        })
                    }
                })
            },
            toDrawCanvas() {
                const left_padding = uni.upx2px(64)
                const top_padding = uni.upx2px(120)
                let ctx = uni.createCanvasContext('mini_poster')
                ctx.fillStyle = '#FFFFFF'
                ctx.fillRect(0, 0, this.canvasW, this.canvasH)

                ctx.setFillStyle('#333333')
                ctx.setFontSize(20)
                ctx.setTextAlign('center')
                ctx.fillText(this.nickname, 0.5 * this.canvasW, top_padding)

                const that = this
                uni.downloadFile({
                    url: this.mpWxQr,
                    success: (res) => {
                        ctx.drawImage(res.tempFilePath, (that.canvasW - 180) * 0.5, top_padding + 20, 180, 180)
                        ctx.draw()
                    },
                    fail() {
                        uni.showToast({
                            icon: 'none',
                            title: '小程序码下载失败'
                        })
                    }
                })
            }
        }
    }
</script>

<style>
</style>


 收藏人数:
收藏人数:
 下载插件并导入HBuilderX
 赞赏(0)
赞赏(0)

 下载 10543
 赞赏 23
赞赏 23

 下载 13374141
 赞赏 1845


 赞赏
赞赏

 京公网安备:11010802035340号