


 https://github.com/nap-liu/uni-app-react
 https://www.npmjs.com/package/@js-css/uni-app-react
 下载插件并导入HBuilderX
 下载插件ZIP
 赞赏(0)
赞赏(0)
更新记录
0.0.3(2025-09-19) 下载此版本
uni-app-react
介绍
让 uni-app 支持 React 开发能力
可以局部使用React,也可以全局使用
React 使用范围完全由开发者自行决定
React Vue 双框架无缝使用,混合开发
核心能力
- 极限体积:
- 运行时核心库仅30+KB,加上preact的20KB,仅需50KB就可以运行 React
- 微信小程序会额外付出150KB左右的模版空间
- 支付宝小程序额外付出30KB左右的模版空间
- React:在 uni-app 项目中直接编写和运行 React 组件,兼容微信/支付宝/钉钉/H5/APP 平台。
- Vue in React:Vue 组件可以无缝在 React 中使用
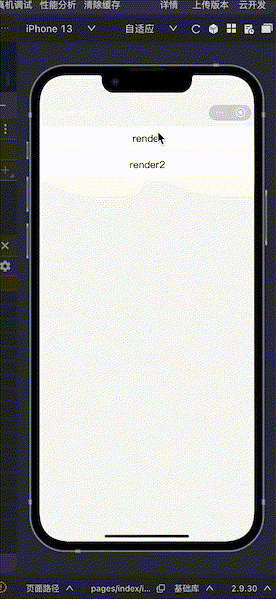
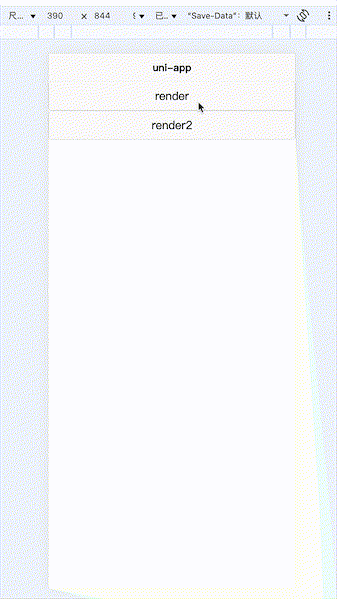
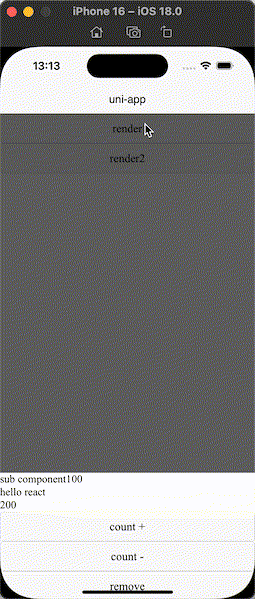
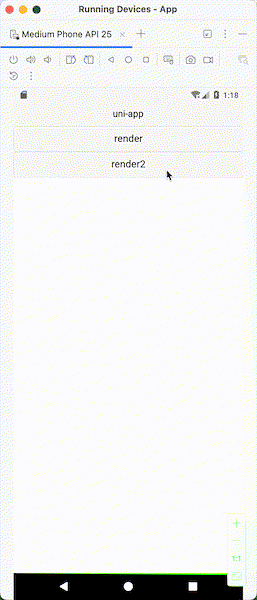
示例
不同环境运行效果图
| 微信小程序 | 支付宝小程序 | H5 | IOS | Android |
|---|---|---|---|---|
 |
 |
 |
 |
 |
示例代码
<template>
  <button @click="handleRender">render</button>
  <button @click="handleRender2">render2</button>
  <!-- 页面中放置渲染根组件 -->
  <ReactRender @mounted="handleMounted"></ReactRender>
</template>

<script setup lang="tsx">
import { Button, connectVueObserver, View } from '@js-css/uni-app-react'
// 引用渲染组件
import ReactRender from '@js-css/uni-app-react/react.vue'
import { useEffect, useRef, useState } from 'react'
import { ref } from 'vue'
import type { CalendarExpose } from 'wot-design-uni/components/wd-calendar/types'

const renderRef = ref<any>()

const handleMounted = (event: any) => {
  renderRef.value = event
  console.log('react mounted', event)
}

const visibleRef = ref(false)
const VueActionSheet = () => {
  return (
    <wd-action-sheet
      modelValue={visibleRef.value}
      title='动作面板'
      rootPortal={true}
      onCancel={() => {
        console.log('cancel')
        visibleRef.value = false
      }}
      ={(event) => {
        console.log('', event)
        visibleRef.value = false
      }}
      onClick-modal={() => {
        console.log('click modal')
        visibleRef.value = false
      }}
      actions={[
        {
          name: '动作1',
        },
        {
          name: '动作2',
        },
      ]}
    ></wd-action-sheet>
  )
}

// 快速高阶组件,让react可以响应vue的ref,reactive对象
const AutoVueActionSheet = connectVueObserver(VueActionSheet)

const handleRender2 = () => {
  const Switch = () => {
    const [visible, setVisible] = useState(true)

    useEffect(() => {
      if (!visible) {
        renderRef.value?.unmount(id)
      }
    }, [visible])

    const [time, setTime] = useState(new Date())

    const calendarRef = useRef<CalendarExpose>(null)

    return (
      <>
        <wd-popup
          rootPortal={true}
          model-value={visible}
          onClick-modal={() => {
            setVisible(false)
          }}
        >
          <Button
            onClick={() => {
              calendarRef.current?.open()
            }}
          >
            vue ref method
          </Button>
          <wd-button
            onClick={() => {
              visibleRef.value = true
            }}
          >
            open sheet
          </wd-button>
          <wd-calendar
            ref={calendarRef}
            rootPortal={true}
            modelValue={time.getTime()}
            onConfirm={(result) => {
              console.log('calendar confirm', result)
              setTime(new Date(result.value))
            }}
          >
            select date
          </wd-calendar>

          <wd-card>
            <View slot='title'>title</View>
            <View>{time.toISOString()}</View>
            <View slot='footer'>
              <wd-button type='error'>button</wd-button>
            </View>
          </wd-card>
        </wd-popup>
        <AutoVueActionSheet></AutoVueActionSheet>
      </>
    )
  }

  const id = renderRef.value?.render(<Switch></Switch>)
}
const handleRender = () => {
  const SubComponent = (props: any) => {
    const { children } = props
    const [value, setValue] = useState(100)
    useEffect(() => {
      const timer = setInterval(() => {
        setValue((value) => {
          if (value >= 110) {
            clearInterval(timer)
          }
          return value + 1
        })
      }, 1000)
      return () => {
        clearInterval(timer)
      }
    }, [])
    return (
      <View>
        sub component
        {value}
        {value % 2 === 0 ? children : null}
      </View>
    )
  }
  const HelloReact = (props: any) => {
    const [value, setValue] = useState(200)
    const { unmount } = props
    const [visible, setVisible] = useState(true)
    useEffect(() => {
      if (!visible) {
        setTimeout(() => {
          unmount()
        }, 500)
      }
    }, [visible])
    return (
      <wd-popup
        model-value={visible}
        root-portal={true}
        position='bottom'
        onEnter={(event) => {
          console.log('enter')
        }}
        onClose={() => {
          console.log('close')
        }}
      >
        <SubComponent a={2}>
          <View>
            {true}
            {false}
          </View>
        </SubComponent>
        {value % 2 === 0 ? <View>hello react</View> : null}
        <View>{value}</View>
        <Button onClick={() => setValue((v) => v + 1)}>count +</Button>
        <Button onClick={() => setValue((v) => v - 1)}>count -</Button>
        <Button
          onClick={(event) => {
            console.log('remove', event)
            setVisible(false)
          }}
        >
          remove
        </Button>
      </wd-popup>
    )
  }

  const id = renderRef.value?.render(
    <HelloReact
      unmount={() => {
        renderRef.value?.unmount(id)
      }}
    />
  )
}
</script>
API 说明
react.vue 是对外提供React能力的入口组件,只需要在需要React能力的地方引入该组件即可。
<template>
  <ReactRender @mounted="handleMounted"></ReactRender>
</template>

<script setup lang="tsx">
import { Button, View, Render } from '@js-css/uni-app-react'
import ReactRender from '@js-css/uni-app-react/react.vue'
import { useEffect, useRef, useState } from 'react'
import { ref } from 'vue'

const renderRef = ref<Render>()

const HelloReact = (props: any) => {
  return (
    <Button
      onClick={() => {
        props.unmount()
      }}
    >
      Hello React
    </Button>
  )
}

const handleMounted = (event: any) => {
  renderRef.value = event
  console.log('react mounted', event)
  const id = renderRef.value?.render(
    <HelloReact
      unmount={() => {
        renderRef.value?.unmount(id)
      }}
    />
  )
}
</script>
Vue in React
本插件的核心能力之一,可以在 React 组件中无缝使用 Vue 组件
const handleRender = () => {
  const HelloReact = (props: any) => {
    const [value, setValue] = useState(200)
    const { unmount } = props
    const [visible, setVisible] = useState(true)
    useEffect(() => {
      if (!visible) {
        setTimeout(() => {
          // 调用传入的卸载组件的方法
          unmount()
        }, 500)
      }
    }, [visible])

    // wd-popup 组件是wot-design-uni组件库中的一个弹窗组件
    return (
      <wd-popup
        model-value={visible}
        root-portal={true}
        position='bottom'
        onEnter={(event) => {
          console.log('enter')
        }}
        onClose={() => {
          console.log('close')
        }}
      >
        <Button onClick={() => setValue((v) => v + 1)}>count +</Button>
        <Button onClick={() => setValue((v) => v - 1)}>count -</Button>
        <Button
          onClick={(event) => {
            console.log('remove', event)
            setVisible(false)
          }}
        >
          remove
        </Button>
      </wd-popup>
    )
  }

  // 调用 react.vue 组件的渲染方法,渲染React组件
  // 该方法会返回一个组件id,可以通过该id更新、卸载组件
  const id = renderRef.value?.render(
    <HelloReact
      unmount={() => {
        // 传递卸载方法到组件中
        renderRef.value?.unmount(id)
      }}
    />
  )
}
组件
框架提供了三种形式的组件,Host组件、内置组件、Vue组件
内置组件就是框架自带的组件,比如<View>、<Text>、<Button>等
Vue组件就是vue-proxy.vue中注册的组件
Host组件就是由当前环境提供的组件,比如小程序中的button、text、view等
Host组件是不推荐使用的,除非某些特性还没有支持,或者说差异化的场景下才需要使用
推荐使用内置组件
// 使用内置组件代替Host组件,因为内置组件会自动转换成当前环境的Host组件
import { Button, View, Text } from '@js-css/uni-app-react'

export default function App() {
  return (
    <View>
      <Text>Hello UniApp React</Text>
      <Button>Click Me</Button>
    </View>
  )
}
使用方法
安装插件
# 安装插件包
npm i @js-css/uni-app-react
# 安装依赖包
npm i preact @types/react
在 vite.config.ts 中添加如下配置
import { defineConfig } from 'vite'
import uni from '@dcloudio/vite-plugin-uni'
import { UniAppReact } from '@js-css/uni-app-react/dist/plugins/jsx'
import * as path from 'node:path'

// https://vitejs.dev/config/
export default defineConfig({
  plugins: [
    // 添加插件
    UniAppReact(),
    uni(),
  ],
  resolve: {
    alias: {
      '@': '/src',
      // 添加下面四个alias
      react: path.resolve(__dirname, './node_modules/preact/compat'),
      'react-is': path.resolve(__dirname, './node_modules/preact/compat'),
      'react-dom': path.resolve(__dirname, './node_modules/preact/compat'),
      '@js-css/uni-app-react': path.resolve(
        __dirname,
        './node_modules/@js-css/uni-app-react'
      ),
    },
  },
})
在 pages.json 中添加一个全局组件 "document": "/document" 该组件由插件自动注入
{
  "pages": [
    ...
  ],
  "globalStyle": {
    "navigationBarTextStyle": "black",
    ...
    // 添加一个固定的全局组件,该组件由插件自动注入,只需要添加配置即可
    "usingComponents": {
      "document": "/document"
    }
  }
}
欢迎提交PR
本插件是个人开发并持续迭代中,现阶段肯定是不完善的,欢迎各路大神提issue,欢迎各路大神提PR
特别鸣谢
- uni-app 感谢DCloud团队的贡献,为前端提供了一个优秀的跨平台解决方案
- taro 感谢taro团队的贡献,本插件大量参考了taro框架的设计
- preact 感谢preact团队实现的精简版本react实现
实现原理
平台兼容性
uni-app(4.75)
| Vue2 | Vue3 | Chrome | Safari | app-vue | app-nvue | Android | iOS | 鸿蒙 |
|---|---|---|---|---|---|---|---|---|
| × | √ | √ | √ | √ | × | √ | √ | × |
| 微信小程序 | 支付宝小程序 | 抖音小程序 | 百度小程序 | 快手小程序 | 京东小程序 | 鸿蒙元服务 | QQ小程序 | 飞书小程序 | 小红书小程序 | 快应用-华为 | 快应用-联盟 |
|---|---|---|---|---|---|---|---|---|---|---|---|
| √ | √ | × | × | × | × | × | × | × | - | × | × |
uni-app-react
介绍
让 uni-app 支持 React 开发能力
可以局部使用React,也可以全局使用
React 使用范围完全由开发者自行决定
React Vue 双框架无缝使用,混合开发
核心能力
- 极限体积:
- 运行时核心库仅30+KB,加上preact的20KB,仅需50KB就可以运行 React
- 微信小程序会额外付出150KB左右的模版空间
- 支付宝小程序额外付出30KB左右的模版空间
- React:在 uni-app 项目中直接编写和运行 React 组件,兼容微信/支付宝/钉钉/H5/APP 平台。
- Vue in React:Vue 组件可以无缝在 React 中使用
示例
不同环境运行效果图
| 微信小程序 | 支付宝小程序 | H5 | IOS | Android |
|---|---|---|---|---|
|
|
|
|
|
示例代码
<template>
  <button @click="handleRender">render</button>
  <button @click="handleRender2">render2</button>
  <!-- 页面中放置渲染根组件 -->
  <ReactRender @mounted="handleMounted"></ReactRender>
</template>

<script setup lang="tsx">
import { Button, connectVueObserver, View } from '@js-css/uni-app-react'
// 引用渲染组件
import ReactRender from '@js-css/uni-app-react/react.vue'
import { useEffect, useRef, useState } from 'react'
import { ref } from 'vue'
import type { CalendarExpose } from 'wot-design-uni/components/wd-calendar/types'

const renderRef = ref<any>()

const handleMounted = (event: any) => {
  renderRef.value = event
  console.log('react mounted', event)
}

const visibleRef = ref(false)
const VueActionSheet = () => {
  return (
    <wd-action-sheet
      modelValue={visibleRef.value}
      title='动作面板'
      rootPortal={true}
      onCancel={() => {
        console.log('cancel')
        visibleRef.value = false
      }}
      ={(event) => {
        console.log('', event)
        visibleRef.value = false
      }}
      onClick-modal={() => {
        console.log('click modal')
        visibleRef.value = false
      }}
      actions={[
        {
          name: '动作1',
        },
        {
          name: '动作2',
        },
      ]}
    ></wd-action-sheet>
  )
}

// 快速高阶组件,让react可以响应vue的ref,reactive对象
const AutoVueActionSheet = connectVueObserver(VueActionSheet)

const handleRender2 = () => {
  const Switch = () => {
    const [visible, setVisible] = useState(true)

    useEffect(() => {
      if (!visible) {
        renderRef.value?.unmount(id)
      }
    }, [visible])

    const [time, setTime] = useState(new Date())

    const calendarRef = useRef<CalendarExpose>(null)

    return (
      <>
        <wd-popup
          rootPortal={true}
          model-value={visible}
          onClick-modal={() => {
            setVisible(false)
          }}
        >
          <Button
            onClick={() => {
              calendarRef.current?.open()
            }}
          >
            vue ref method
          </Button>
          <wd-button
            onClick={() => {
              visibleRef.value = true
            }}
          >
            open sheet
          </wd-button>
          <wd-calendar
            ref={calendarRef}
            rootPortal={true}
            modelValue={time.getTime()}
            onConfirm={(result) => {
              console.log('calendar confirm', result)
              setTime(new Date(result.value))
            }}
          >
            select date
          </wd-calendar>

          <wd-card>
            <View slot='title'>title</View>
            <View>{time.toISOString()}</View>
            <View slot='footer'>
              <wd-button type='error'>button</wd-button>
            </View>
          </wd-card>
        </wd-popup>
        <AutoVueActionSheet></AutoVueActionSheet>
      </>
    )
  }

  const id = renderRef.value?.render(<Switch></Switch>)
}
const handleRender = () => {
  const SubComponent = (props: any) => {
    const { children } = props
    const [value, setValue] = useState(100)
    useEffect(() => {
      const timer = setInterval(() => {
        setValue((value) => {
          if (value >= 110) {
            clearInterval(timer)
          }
          return value + 1
        })
      }, 1000)
      return () => {
        clearInterval(timer)
      }
    }, [])
    return (
      <View>
        sub component
        {value}
        {value % 2 === 0 ? children : null}
      </View>
    )
  }
  const HelloReact = (props: any) => {
    const [value, setValue] = useState(200)
    const { unmount } = props
    const [visible, setVisible] = useState(true)
    useEffect(() => {
      if (!visible) {
        setTimeout(() => {
          unmount()
        }, 500)
      }
    }, [visible])
    return (
      <wd-popup
        model-value={visible}
        root-portal={true}
        position='bottom'
        onEnter={(event) => {
          console.log('enter')
        }}
        onClose={() => {
          console.log('close')
        }}
      >
        <SubComponent a={2}>
          <View>
            {true}
            {false}
          </View>
        </SubComponent>
        {value % 2 === 0 ? <View>hello react</View> : null}
        <View>{value}</View>
        <Button onClick={() => setValue((v) => v + 1)}>count +</Button>
        <Button onClick={() => setValue((v) => v - 1)}>count -</Button>
        <Button
          onClick={(event) => {
            console.log('remove', event)
            setVisible(false)
          }}
        >
          remove
        </Button>
      </wd-popup>
    )
  }

  const id = renderRef.value?.render(
    <HelloReact
      unmount={() => {
        renderRef.value?.unmount(id)
      }}
    />
  )
}
</script>
API 说明
react.vue 是对外提供React能力的入口组件,只需要在需要React能力的地方引入该组件即可。
<template>
  <ReactRender @mounted="handleMounted"></ReactRender>
</template>

<script setup lang="tsx">
import { Button, View, Render } from '@js-css/uni-app-react'
import ReactRender from '@js-css/uni-app-react/react.vue'
import { useEffect, useRef, useState } from 'react'
import { ref } from 'vue'

const renderRef = ref<Render>()

const HelloReact = (props: any) => {
  return (
    <Button
      onClick={() => {
        props.unmount()
      }}
    >
      Hello React
    </Button>
  )
}

const handleMounted = (event: any) => {
  renderRef.value = event
  console.log('react mounted', event)
  const id = renderRef.value?.render(
    <HelloReact
      unmount={() => {
        renderRef.value?.unmount(id)
      }}
    />
  )
}
</script>
Vue in React
本插件的核心能力之一,可以在 React 组件中无缝使用 Vue 组件
const handleRender = () => {
  const HelloReact = (props: any) => {
    const [value, setValue] = useState(200)
    const { unmount } = props
    const [visible, setVisible] = useState(true)
    useEffect(() => {
      if (!visible) {
        setTimeout(() => {
          // 调用传入的卸载组件的方法
          unmount()
        }, 500)
      }
    }, [visible])

    // wd-popup 组件是wot-design-uni组件库中的一个弹窗组件
    return (
      <wd-popup
        model-value={visible}
        root-portal={true}
        position='bottom'
        onEnter={(event) => {
          console.log('enter')
        }}
        onClose={() => {
          console.log('close')
        }}
      >
        <Button onClick={() => setValue((v) => v + 1)}>count +</Button>
        <Button onClick={() => setValue((v) => v - 1)}>count -</Button>
        <Button
          onClick={(event) => {
            console.log('remove', event)
            setVisible(false)
          }}
        >
          remove
        </Button>
      </wd-popup>
    )
  }

  // 调用 react.vue 组件的渲染方法,渲染React组件
  // 该方法会返回一个组件id,可以通过该id更新、卸载组件
  const id = renderRef.value?.render(
    <HelloReact
      unmount={() => {
        // 传递卸载方法到组件中
        renderRef.value?.unmount(id)
      }}
    />
  )
}
组件
框架提供了三种形式的组件,Host组件、内置组件、Vue组件
内置组件就是框架自带的组件,比如<View>、<Text>、<Button>等
Vue组件就是vue-proxy.vue中注册的组件
Host组件就是由当前环境提供的组件,比如小程序中的button、text、view等
Host组件是不推荐使用的,除非某些特性还没有支持,或者说差异化的场景下才需要使用
推荐使用内置组件
// 使用内置组件代替Host组件,因为内置组件会自动转换成当前环境的Host组件
import { Button, View, Text } from '@js-css/uni-app-react'

export default function App() {
  return (
    <View>
      <Text>Hello UniApp React</Text>
      <Button>Click Me</Button>
    </View>
  )
}
使用方法
安装插件
# 安装插件包
npm i @js-css/uni-app-react
# 安装依赖包
npm i preact @types/react
在 vite.config.ts 中添加如下配置
import { defineConfig } from 'vite'
import uni from '@dcloudio/vite-plugin-uni'
import { UniAppReact } from '@js-css/uni-app-react/dist/plugins/jsx'
import * as path from 'node:path'

// https://vitejs.dev/config/
export default defineConfig({
  plugins: [
    // 添加插件
    UniAppReact(),
    uni(),
  ],
  resolve: {
    alias: {
      '@': '/src',
      // 添加下面四个alias
      react: path.resolve(__dirname, './node_modules/preact/compat'),
      'react-is': path.resolve(__dirname, './node_modules/preact/compat'),
      'react-dom': path.resolve(__dirname, './node_modules/preact/compat'),
      '@js-css/uni-app-react': path.resolve(
        __dirname,
        './node_modules/@js-css/uni-app-react'
      ),
    },
  },
})
在 pages.json 中添加一个全局组件 "document": "/document" 该组件由插件自动注入
{
  "pages": [
    ...
  ],
  "globalStyle": {
    "navigationBarTextStyle": "black",
    ...
    // 添加一个固定的全局组件,该组件由插件自动注入,只需要添加配置即可
    "usingComponents": {
      "document": "/document"
    }
  }
}
欢迎提交PR
本插件是个人开发并持续迭代中,现阶段肯定是不完善的,欢迎各路大神提issue,欢迎各路大神提PR
特别鸣谢
- uni-app 感谢DCloud团队的贡献,为前端提供了一个优秀的跨平台解决方案
- taro 感谢taro团队的贡献,本插件大量参考了taro框架的设计
- preact 感谢preact团队实现的精简版本react实现
实现原理
欢迎打赏
您的支持就是我的最大动力
| 微信 | 支付宝 |
|---|---|
 |
 |

 下载 11
下载 11
 赞赏 0
赞赏 0

 下载 12290560
 赞赏 1922


 赞赏
赞赏
 京公网安备:11010802035340号