更新记录
1.0.7(2021-11-25)
1、增加发送btye数据; 2、优化iOS 断线重连功能; 3、增加了发送消息状态回调;
1.0.6(2021-10-11)
1、优化了心跳检测; 2、增加了字节流数据的接收; 3、提供了node.js 服务端参考demo
1.0.5(2021-04-28)
1、修复android 闪退
查看更多平台兼容性
| Android | Android CPU类型 | iOS |
|---|---|---|
| 适用版本区间:4.4 - 11.0 | armeabi-v7a:未测试,arm64-v8a:未测试,x86:未测试 | 适用版本区间:10 - 14 |
原生插件通用使用流程:
- 购买插件,选择该插件绑定的项目。
- 在HBuilderX里找到项目,在manifest的app原生插件配置中勾选模块,如需要填写参数则参考插件作者的文档添加。
- 根据插件作者的提供的文档开发代码,在代码中引用插件,调用插件功能。
- 打包自定义基座,选择插件,得到自定义基座,然后运行时选择自定义基座,进行log输出测试。
- 开发完毕后正式云打包
付费原生插件目前不支持离线打包。
Android 离线打包原生插件另见文档 https://nativesupport.dcloud.net.cn/NativePlugin/offline_package/android
iOS 离线打包原生插件另见文档 https://nativesupport.dcloud.net.cn/NativePlugin/offline_package/ios
注意事项:使用HBuilderX2.7.14以下版本,如果同一插件且同一appid下购买并绑定了多个包名,提交云打包界面提示包名绑定不一致时,需要在HBuilderX项目中manifest.json->“App原生插件配置”->”云端插件“列表中删除该插件重新选择
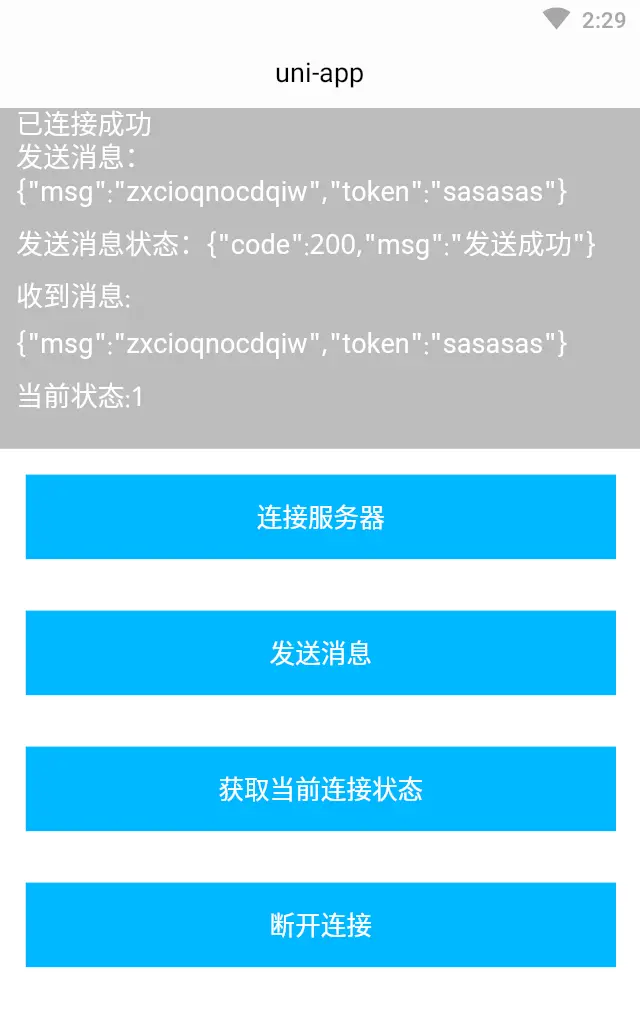
集成原生WebSocket
更新提示:1、增加了发送消息回调状态;
2、增加了发送btye数据;
3、优化了ios断线重连功能;
特点:
1、断线重连功能;
2、心跳检测功能;
3、支持接受字符串和字节流数据;
4、可发送字节流数据
插件使用介绍;
先引入插件: let WebSocketTool=uni.requireNativePlugin("CL-WebSocket");
1、初始化
          WebSocketTool.initWS({
                        url:"ws://192.168.50.215:7272",//ws服务器地址
                        pingInterval:5//心跳频率单位s
                });
2、连接服务器;
        //进行服务器连接;
        //连接操作,除非用户主动断开,否则不需要再次调用这个接口,因为内部集成了断开重连功能;
            WebSocketTool.connect(result=>{
                console.log(result);
                let type=result.type;
                if(type=='onOpen')
                {
            uni.showToast({
              title:"已连接成功"
            })

                }
                else if(type=='onReconnect')
                {
            uni.showToast({
              title:"重新连接中"
            })

                }
                else if(type=='onClosed')
                {

            uni.showToast({
              title:"服务器已断开"
            })

                }
                else if(type=='onFailure')
                {
                    uni.showToast({
                        title:"连接失败,请等待重连"
                    })

                }
            });
3、监听服务器发送的消息;
    //监听字符串数据
  WebSocketTool.onSocketMessage(result=>{

            console.log("收到消息:"+result);

    })
//监听流数据
WebSocketTool.onSocketByte(result=>{
                //数据做了base64处理;
                console.log("收到btye数据:"+result);
                this.msgAr.push("收到btye数据:"+result)

            });
4、获取连接状态;
    getConnectState: async function(){
     //1表示已连接, -1表示未连接,  0表示正在连接中;
      let state=await WebSocketTool.getCurrentStatus();
           uni.showModal({
            content:"当前状态:"+state
           })

    }
5、发送消息;
    sendMsg: async function(){
            //需要判断一下是否连接
            let state=await WebSocketTool.getCurrentStatus();
            if(state==1)
            {

                WebSocketTool.sendMessage({"code":120,msg:"zxcioqnocdqiw",token:"sasasas"},result=>{

                        //发送状态回调;

                });

            }
            else{

                uni.showModal({
                    content:"未连接服务器"
                })

            }
}
6、发送byte 数据
sendMsg: async function(){
        //需要判断一下是否连接
        let state=await WebSocketTool.getCurrentStatus();
        if(state==1)
        {

            let msg="hello 你好 你好";
                let baseStr=Buffer.from(msg).toString("base64");
              //需转成base64
       WebSocketTool.sendByteString(baseStr,result=>{

                    //发送状态回调;

                });

        }
        else{

            uni.showModal({
                content:"未连接服务器"
            })

        }
}
7、主动断开连接;(执行该方法之后,需要调用连接接口才能进行连接服务器)
WebSocketTool.closeWS();
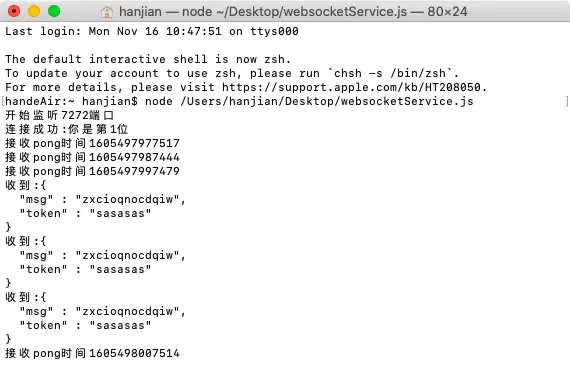
服务端demo node.js 参考;更多详情可以参考 https://blog.csdn.net/LiMubai_CN/article/details/81844156 了解如何使用ws
`
 const WebSocketServer=require("ws");

const wss = new WebSocketServer.Server({ port: 7272 });
wss.on('connection', function connection(ws) {
ws.on('message', function incoming(message) {
console.log('received: %s', message);
ws.send('something'+message);
});
  ws.send('something');
  ws.on("pong",function(data){

     console.log('收到心跳啦啦啦'+data);

  })
  ws.on("ping",function(data){

    console.log('收到心跳啦啦啦'+data);
        ws.send("asasa",{binary:true}); //发送的是字节流数据

  })
  // 退出
  ws.on('close', function(close) {
      console.log('退出连接了');
      ws.send('退出连接');
  });
  ws.on('error', function(error) {
      console.log('错误信息'+error);

  });
 });
console.log('开始监听7272端口');
`


 收藏人数:
收藏人数:
 购买(
购买( 试用
试用
 使用 HBuilderX 导入示例项目
 赞赏(0)
赞赏(0)


 下载 7713
 赞赏 2
赞赏 2

 下载 12756


 赞赏 0
赞赏 0


 赞赏
赞赏

 京公网安备:11010802035340号