


 https://github.com/WestCraneLi/heli_uniapp
 下载插件并导入HBuilderX
 下载插件ZIP
 赞赏(0)
赞赏(0)
更新记录
v1.0.11111(2022-06-05) 下载此版本
在mainfest.json的源码视图里的小程序配置里添加了开启分包,同时在基础配置中删除了UID,所以之后下载的话,需要重新获取一下
v1.0.1111(2022-06-01) 下载此版本
修改了easycom配置uview的信息,使得在部分情况下让小程序正常渲染
v1.0.111(2022-05-24) 下载此版本
暂无
查看更多平台兼容性
uni-app
| Vue2 | Vue3 | Chrome | Safari | app-vue | app-nvue | Android | iOS | 鸿蒙 |
|---|---|---|---|---|---|---|---|---|
| √ | - | - | - | - | - | - | - | - |
| 微信小程序 | 支付宝小程序 | 抖音小程序 | 百度小程序 | 快手小程序 | 京东小程序 | 鸿蒙元服务 | QQ小程序 | 飞书小程序 | 小红书小程序 | 快应用-华为 | 快应用-联盟 |
|---|---|---|---|---|---|---|---|---|---|---|---|
| √ | - | - | - | - | - | - | - | - | - | - | - |
使用UI组件
uview 链接:uview
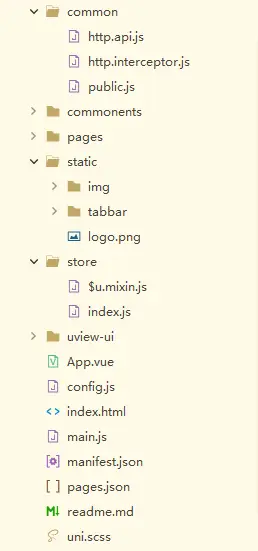
文件夹说明
common
-
http.api.js
import config from '../config.js'; /* api接口管理 样例说明: 如:config里有HOST:127.0.0.1,他作为主机地址,用于拼接路径 如: const HOST=config.HOST let testApi=HOST+'test/test' const install=(Vue,vm)=>{ //可以post还是get看需求 let getTestApi=(params={})=>vm.$u.http.post(testApi,param); vm.$u.api={ getTestApi } } */ //--one接口测试 let oneApi='https://api.xygeng.cn/one' // 此处第二个参数vm,就是我们在页面使用的this,你可以通过vm获取vuex等操作,更多内容详见uView对拦截器的介绍部分: // https://uviewui.com/js/http.html#%E4%BD%95%E8%B0%93%E8%AF%B7%E6%B1%82%E6%8B%A6%E6%88%AA%EF%BC%9F const install = (Vue, vm) => { // 将各个定义的接口名称,统一放进对象挂载到vm.$u.api(因为vm就是this,也即this.$u.api)下 let getOneApi = (params = {}) => vm.$u.http.get(oneApi,params); vm.$u.api = { getOneApi }; } export default { install } //在pages/index/index.vue下可以这样子使用 this.$u.api.getOneApi().then(res=>{ this.oneSentence=res.data.content; }) - http.interceptor.js
const install = (Vue,vm)=>{ //配置全局项,可更改,详情看uview官网 uni.$u.http.setConfig((config)=>{ config.header = { 'Content-type': 'application/x-www-form-urlencoded' } return config; },config=>{ return Promise.reject(config) }) // 请求拦截 uni.$u.http.interceptors.request.use((config) => { // 可使用async await 做异步操作 // 初始化请求拦截器时,会执行此方法,此时data为undefined,赋予默认{} // config.data = config.data || {} // 根据custom参数中配置的是否需要token,添加对应的请求头 // if(config?.custom?.auth) { // // 可以在此通过vm引用vuex中的变量,具体值在vm.$store.state中 // config.header.token = vm.$store.state.userInfo.token // } config.header.Token = vm.vuex_token; // console.log('config:', config) // if(config.url == '/get_update'){ // config.showLoading = false; // } return config }, config => { // 可使用async await 做异步操作 return Promise.reject(config) }) //响应拦截 uni.$u.http.interceptors.response.use((res) => { /* 对响应成功做点什么 可使用async await 做异步操作*/ // if (response.data.code !== 200) { // 服务端返回的状态码不等于200,则reject() // return Promise.reject(response) // return Promise.reject 可使promise状态进入catch // if (response.config.custom.verification) { // 演示自定义参数的作用 // return response.data // } return res.data }, (err) => { /* 对响应错误做点什么 (statusCode !== 200)*/ if(err.statusCode==500){ vm.$u.toast(err.statusCode + '-服务器出错~') } else if(err.statusCode==404){ vm.$u.toast(err.statusCode + '-访问地址有误~', 2000) } else{ setTimeout(()=>{ uni.reLaunch({ url:'../pages/login/login' }) },2000) } return Promise.reject(err) }) } export default { install } - public.js
一些公共函数存放位置
components
组件存放目录,命名方式可以为 前缀-组件名 方便使用uniapp的
easycom进行识别,如:t-com,而easycom可以在pase.json文件里配置,参考官方案例如下:"easycom": { "autoscan": true, "custom": { "^uni-(.*)": "@/components/uni-$1.vue", // 匹配components目录内的vue文件 "^vue-file-(.*)": "packageName/path/to/vue-file-$1.vue" // 匹配node_modules内的vue文件 } }而这块内容就会和uview引入方式是一样的,因为传统vue组件,需要安装、引用、注册,三个步骤后才能使用组件。easycom将其精简为一步。 只要组件安装在项目的components目录下,并符合components/组件名称/组件名称.vue目录结构。就可以不用引用、注册,直接在页面中使用 具体可根据需要建立
common文件夹代表公共组件,复用率高的,或者其他 参考链接:uniapp easycomstatic
- img文件夹存放图片,可根据需要再往里继续创建每个页面用到的图片,比如img/pagesA/xxx.png
- tabbar文件夹存放底部导航栏图片
- logo.png官方内置的logo图片
-
可根据需要导入相应字体包等其他静态资源
store
使用uview封装vuex,使用方法如下
//---保存, store/index.js下有放vuex_token,vuex_这个前缀方便标识,可根据需要放入vuex_user
let _this= this;
let formData = {
 username:'admin',
 password:'123'
}
_this.$u.api.Login(formData).then(res=>{
if(res.code=='1000'){
    _this.$u.vuex('vuex_token',res.Authorization);
    _this.$u.vuex('vuex_user',{
        username:res.username,
    })
}
}).catch(err=>{
_this.$u.toast(err.error + '-访问地址有误~', 2000)
})
//---调用,以token为例,this.vuex_token即可获取到,如果是user的话,就是this.vuex_user.xxxx
console.log(this.vuex_token)
config.js
全局配置项目,比如一些服务器地址和appid等
/**
 * @description 全局配置
 */
const deBug = false; // true-测试环境 false-生产环境

// const accountInfo = uni.getAccountInfoSync();
// const appid = accountInfo.miniProgram.appId;

export default{
    // appid: appid, // 当前微信小程序appid
    // version: '1.0.0', // 版本号
    Host:deBug?'http://127.0.0.1:5000':'http://xxx.xxx.xxx.xxx:xxxx'//服务器地址,可放入相关服务器地址
}
main.js
//全局注册store和拦截器
import App from './App'

// #ifndef VUE3
import Vue from 'vue'
Vue.config.productionTip = false
App.mpType = 'app'

import store from '@/store'
// 引入uView提供的对vuex的简写法文件
let vuexStore = require('@/store/$u.mixin.js')
Vue.mixin(vuexStore)
import uView from 'uview-ui'
Vue.use(uView)
// 如此配置即可
uni.$u.config.unit = 'rpx'

const app = new Vue({
    store,
    ...App
})

// http拦截器,将此部分放在new Vue()和app.$mount()之间,才能App.vue中正常使用
import httpInterceptor from '@/common/http.interceptor.js'
Vue.use(httpInterceptor, app)

// http接口API抽离,免于写url或者一些固定的参数
import httpApi from '@/common/http.api.js'
Vue.use(httpApi, app)

app.$mount()
pages.json
配置了tabbar选项和分包加载内容,可以根据设置分包或者删除 详情参考:uniapp tabbar配置 分包地址,我个人做法是这样,有个pagesub文件夹作为分包,前缀加上pages主要刚好可以和排在pages文件夹下面,清晰,所以命名格式可以是这样:pagesxxxx,仅供参考
condition配置可以根据HbuilderX自带的服务进行创建:运行->小程序模拟器->微信开发者工具 指定页面->编辑启动页配置// "subPackages":[ // { // "root":"分包地址", // "pages":[ // { // "path":"root下的页面地址", // "style" : // { // "navigationBarTitleText": "", // "enablePullDownRefresh": false // } // } // ] // } // ], // "preloadRule": { // "pagesA/list/list": { // "network": "all", // "packages": ["__APP__"] // }, // "pagesB/detail/detail": { // "network": "all", // "packages": ["pagesA"] // } // },同时,加入了midbutton配置项,可根据需要删除或者改变大小和图片
"tabBar": {
    "color": "#7A7E83",
    "selectedColor": "#ff5500",
    "borderStyle": "black",
    "backgroundColor": "#ffffff",
    "list": [
        {
            "pagePath": "pages/index/index",
            "iconPath": "static/logo.png",
            "selectedIconPath": "static/logo.png",
            "text": "首页"
        },
        {
            "pagePath": "pages/index/index",
            "iconPath": "static/logo.png",
            "selectedIconPath": "static/logo.png",
            "text": "首页2"
        }
    ],
    "midButton": {
        "width": "150rpx",
        "height": "150rpx",
        "text": "xxxx",
        "iconPath": "/static/logo.png",
        "iconWidth": "116rpx"
        //tabbar的list长度必须对称,比如2,4,图片一般找圆的
    }
},
 下载 458
 赞赏 0
赞赏 0

 下载 12348431
 赞赏 1925


 赞赏
赞赏
 京公网安备:11010802035340号