

 下载插件并导入HBuilderX
 下载插件ZIP
 赞赏(0)
赞赏(0)
更新记录
1.0.0(2023-06-05) 下载此版本
基于https://ext.dcloud.net.cn/plugin?id=6215上进行优化,改进,经本人测试,兼容全端。
平台兼容性
uni-app
| Vue2 | Vue3 | Chrome | Safari | app-vue | app-nvue | Android | iOS | 鸿蒙 |
|---|---|---|---|---|---|---|---|---|
| √ | - | √ | √ | √ | - | - | - | - |
| 微信小程序 | 支付宝小程序 | 抖音小程序 | 百度小程序 | 快手小程序 | 京东小程序 | 鸿蒙元服务 | QQ小程序 | 飞书小程序 | 小红书小程序 | 快应用-华为 | 快应用-联盟 |
|---|---|---|---|---|---|---|---|---|---|---|---|
| √ | √ | √ | √ | √ | √ | - | √ | √ | - | √ | √ |
其他
| 多语言 | 暗黑模式 | 宽屏模式 |
|---|---|---|
| × | × | √ |
扫码直接看效果演示,在个人中心切换白天、夜间模式,效果类似于b站

如何使用
定义theme.js
// 定义导航栏 与 tabbar 主题色
const themes = {
    light:{
        navBar:{
            backgroundColor:'#FFF',
            frontColor:"#000000"
        },
        tabBar:{
            backgroundColor:'#FFF',
            color:'#333',
            selectedColor:'#0BB640',
            borderStyle:'white'
        }
    },
    dark:{
        navBar:{
            backgroundColor:'#333',
            frontColor:"#ffffff"
        },
        tabBar:{
            backgroundColor:'#333',
            color:'#fff',
            selectedColor:'#0BB640',
            borderStyle:'black'
        }
    }
}

export default themes;  //Vuex时建议使用
创建store\index.js
import Vue from 'vue'
import Vuex from 'vuex'
// 引入主题
import themes from '@/common/theme/theme.js';
Vue.use(Vuex)

const store = new Vuex.Store({
    state: {
        // 写上默认皮肤的数据
        skin: `
            --nav-bg:#42b983;
            --nav-color:#ffffff;
        `,
        theme:themes[uni.getStorageSync('theme') || 'light']
    },
    getters: {

    },
    mutations: {
        // 皮肤更换
        skinPeeler(state,skin = []){
            // 将皮肤配置JSON转为以 ; 分割的字符串(style 值)
            let style = skin.map((item,index)=>{
                return `${item.name}:${item.value}`
            }).join(";");
            state.skin = style;
        },
        updateTheme(state,mode = 'light'){
            state.theme = themes[mode];
        }
    }
})

export default store
main.js中引入store
import Vue from 'vue'
import App from './App'

// 引用 Vuex 文件
import store from './store'

Vue.config.productionTip = false

App.mpType = 'app'

const app = new Vue({
    // 使用 Vuex
    store,
    ...App,
})
app.$mount()
页面使用
<template>
<view :style="skin">
<view class="nav-bar">换肤示例</view>
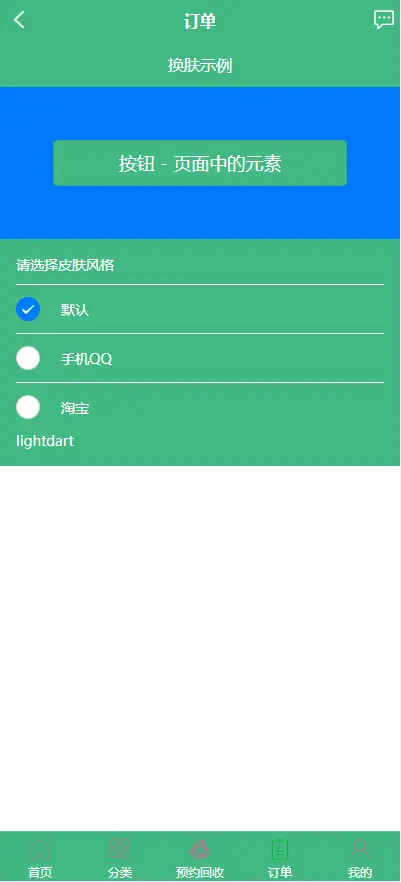
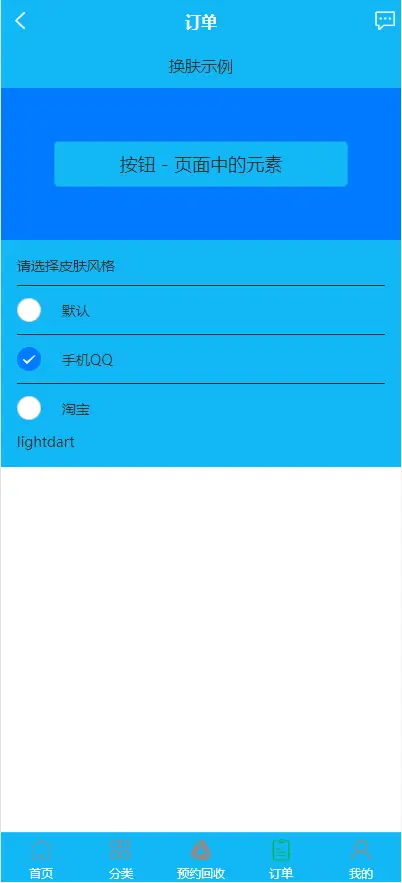
<view style="padding: 100rpx;">
<button type="default" hover-class="none" class="btn">按钮 - 页面中的元素</button>
</view>
<view class="card">
<view style="padding-bottom: 20rpx;">请选择皮肤风格</view>
<radio-group @change="radioChange">
<label class="h-flex-x list-item" v-for="(item, index) in items" :key="index">
<view>
<radio :value="index.toString()" :checked="index === current" />
</view>
<view style="padding-left: 30rpx;">{{item.name}}</view>
</label>
</radio-group>
</view>
</view>
</template>
<script>
export default {
data() {
return {
items: [
{
value: [
{name:'--nav-bg',value:'#42b983'},
{name:'--nav-color',value:'#ffffff'}
],
name: '默认'
},
{
value: [
{name:'--nav-bg',value:'#12b7f5'},
{name:'--nav-color',value:'#333'}
],
name: '手机QQ'
},
{
value: [
{name:'--nav-bg',value:'#ff5500'},
{name:'--nav-color',value:'#F0E0DC'}
],
name: '淘宝'
},
],
current: 0
}
},
computed: {
skin() {
return this.$store.state.skin;
}
},
methods: {
radioChange: function(e) {
let item = this.items[Number(e.detail.value)].value;
this.$store.commit("skinPeeler",item);
// 这种是原始的设置,可改成下面的方式
// 动态设置导航条颜色
uni.setNavigationBarColor({
frontColor:'#ffffff',
backgroundColor:item[0].value
});
// 动态设置tabbar样式
uni.setTabBarStyle({
backgroundColor:item[0].value,
color: '#FFF',
selectedColor: '#FFF',
borderStyle: 'white'
});
}
}
}
</script>
<style lang="scss">
page {
background-color: #fff;
font-size: 28rpx;
}
.h-flex-x{
display: flex;
flex-direction: row;
flex-wrap: nowrap;
justify-content: flex-start;
align-items: center;
align-content: center;
}
.card{
background-color: var(--nav-bg);
color:var(--nav-color);
padding: 30rpx;
}
.list-item{
height: 90rpx;
border-top: var(--nav-color) solid 1px;
}
.nav-bar {
box-sizing: content-box;
height: 44px;
background-color: var(--nav-bg);
padding-top: var(--status-bar-height);
color: var(--nav-color);
line-height: 44px;
text-align: center;
font-size: 16px;
}
.btn {
background-color: var(--nav-bg) !important;
color: var(--nav-color) !important;
}
</style>onReady(){
//Vuex的方式 更新
// 设置导航条
uni.setNavigationBarColor(this.$store.state.theme.navBar);
// 设置tabbar
uni.setTabBarStyle(this.$store.state.theme.tabBar);
},实时更新
this.$store.commit("updateTheme",mode);
// 设置导航条
uni.setNavigationBarColor(this.$store.state.theme.navBar);
// 设置tabbar
uni.setTabBarStyle(this.$store.state.theme.tabBar);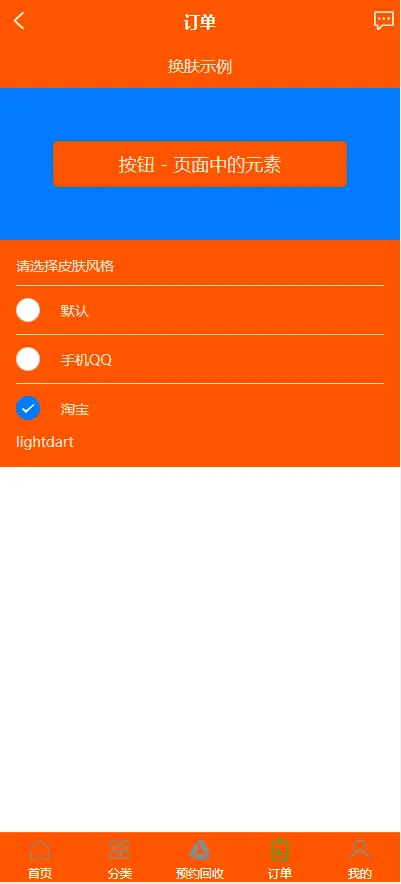
 下载 1631
 赞赏 17
赞赏 17

 下载 12467028
 赞赏 1936


 赞赏
赞赏
 京公网安备:11010802035340号